Thursday, December 23, 2010

Egg Nog

Egg Nog
I think its pretty obvious that egg nog was going to make an appearance on my blog considering just how enthusiastic I am about Christmas.  People often think egg nog is a warm drink because of the foam, which would make sense considering how lovely a sweet warm drink would be during the cold winter months.  However, the foam on top of egg nog is a red herring.  Egg nog is in fact a cold drink and the foam comes from beaten egg whites.  This egg nog is lightened up a little bit because the recipe is by Bethenny Frankel, but it isn't short on flavor whatsoever.  And though the egg nog might not warm you up right away, perhaps a shot of rum or brandy added into the mix will :)

Ingredients
2 eggs plus 2 more whites (whites and yolks separated)
1/3 cup plus 1 tbsp sugar
2 cups milk
1 tsp vanilla extract
1 tsp cinnamon
1 tsp nutmeg

Beat 2 egg yolks until lightened in color. Add the 1/3 cup sugar, beat until dissolved and set aside. Combine the milk with vanilla and a dash each of cinnamon and nutmeg in a saucepan over high heat.  Bring the mixture to a boil, stirring occasionally.

Remove the saucepan from the heat and gradually whisk into egg mixture. This process is called tempering and it prevents the eggs from scrambling.  Return the mixture to the pot and reheat. Remove from heat, pour into a bowl and set in the refrigerator. Beat 4 egg whites in a separate bowl until soft peaks form.  While mixing, gradually add 1 tablespoon sugar and beat until stiff peaks form. Fold whipped egg whites into chilled mixture.  Pour into mugs, sprinkle with cinnamon and enjoy!

Saturday, December 18, 2010

Spearmint Bark

Spearmint Bark
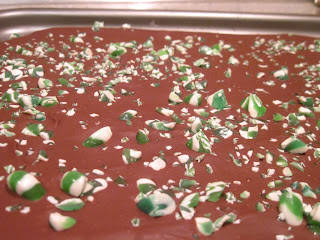
It's definitely looking more like Christmas around San Sebastián.  Several of the streets are lined with lights but I'm starting to get just a littttttle more excited about being home for the holidays :)  Peppermint bark has always been one of my favorites but for some reason candy canes were not as abundantly available in the San Sebastián supermarkets as I had hoped.  After some serious searching, my roommate Brittany spotted some spearmint hard candies in a container at a local corner store.  This spearmint bark tasted SO good and its so easy you really have no excuse not to make it!

Ingredients
12 oz white, milk, or dark chocolate (or any combination of the three!)
1 1/2 cups hard spearmint candies, whole

Before breaking the bark.
There are two ways to go about this recipe.  First, by melting the chocolate in a double boiler.  This method will work perfectly if you are using just one type of chocolate.  However, if you plan on melting white and then milk chocolate the double boiler will probably get to hot and burn the second batch of chocolate.  The second, and in my opinion much easier method, is to put the chocolate in a microwave safe bowl and microwave it in thirty second increments, stirring in between until the chocolate is silky smooth and melted.  If you have some peppermint extract on hand, add a capful into the melted chocolate just to enhance the peppermint flavor even more.


There are two ways of dealing with the spearmint candies as well.  First, by using a food processor.  Second, by placing them all in a plastic bag and whacking them with the back of a frying pan or a meat tenderizer until all of the candies are in tiny pieces.  Both of these methods are equally as effective, although one tends to be more stress relieving than the other.  Once the chocolate is melted and the candies are pulverized, use a fine mesh sieve to strain the larger pieces of candy from the more powdery bits.  Allow the candy powder  to fall into the chocolate and stir.  Pour the chocolate onto a baking sheet lined with aluminum foil and spread using a spatula.  Then, sprinkle the larger pieces of candy on top of the chocolate.  Pop the baking sheet in the refrigerator for an hour and you'll have a large sheet of spearmint bark like the one pictured above.  Once the chocolate is hardened break off pieces however large or small you like them and enjoy!

Friday, December 10, 2010

Gluten-Free Peanut Butter Cookies with Nutella Ganache

Gluten-Free Peanut Butter Cookies
with Nutella Ganache
Let me just start off by saying that these cookies are my masterpiece.  While getting into the Christmas season cookies were naturally my first thought.  My best friend Jadry is among the 1% of people in the United States that have celiac disease and being that her and I have shared countless meals together, I understand how hard it is to find delicious, gluten-free desserts.  I promised Jadry that I would blog a recipe especially for her and I couldn't be prouder of these gluten-free cookies.  I promise you will not miss the gluten one bit whether you're a celiac or not!

Ingredients
1 cup creamy peanut butter
1/2 cup granulated sugar
1/2 cup brown sugar
1 egg
1 tsp cinnamon
1 tsp baking powder
1/2 cup nutella
1/2 cup heavy cream

Preheat oven to 350 degrees fahrenheit. Place the peanut butter, granulated sugar, brown sugar, egg, cinnamon and baking powder in a bowl and mix thoroughly.  Line a baking sheet with foil or parchment paper.  Using your hands, roll the dough into balls about an inch in diameter.  You should be able to make about twenty balls and place them on the lined baking sheet.  Then, press down each ball of dough twice with the back of a fork to form the classic x-shaped peanut butter cookie imprints.  Allow to bake in the oven for ten minutes.

Place the nutella and heavy cream in a small saucepan over medium heat.  Cook for about ten minutes until the nutella has melted and the mixture is smooth then remove from the heat and stir occasionally.  Remove the cookies from the oven, allow to cool, and drizzle with the nutella ganache.  Enjoy!

Saturday, December 4, 2010

Holiday Spiced Nuts

Holiday Spiced Nuts Two Ways
Do you know anyone who is entirely obsessed with Christmas and the holiday season?  I mean someone who is a fully consumed, unhealthily preoccupied Christmas maniac? The answer is yes, you do, and that person is me.  I shamelessly blast my Christmas playlist on repeat every year starting the day after Thanksgiving and my Christmas countdown usually begins on December 26th. However, I do have a bit of an excuse in taking so much joy in the Christmas season and that is because my birthday is on December 25th as well :) But considering that it's only December 4th, I figured I would spare you my full-blown Christmas excitement just yet...but fear not, I certainly plan on bombarding you with edible Christmas treats over the next few weeks!  

These Holiday Spiced Nuts Two ways are festive enough to whet your appetite for all foods Christmasy but not too festive to make you feel like you're jumping the gun.  How perfect!  I made one sweet batch of holiday nuts and one smokey and spicier batch, so whatever your preference, I have a holiday snack for you!  Keep in mind when reading these recipes that you can substitute any nuts you like!  I like mixing different sizes and textures of nuts.  Walnuts and pecans tend to work especially well because their little nooks and crannies hold the seasoning well.

Sugared Walnuts and Spanish Almonds
Ingredients:
8 oz walnut halves
8 oz spanish almonds
1 egg white
1 tbsp water
1/2 cup granulated sugar
1/2 cup brown sugar
1 tbsp cinnamon

Smokey Spicy Mixed Nuts
Ingredients:
6 oz walnut halves
5 oz peanuts
5 oz cashews
1 egg white
1 tbsp water
1 tbsp hot sauce
2 tbsp salt
2 tbsp garlic powder
1 tsp sweet paprika
1 tsp curry
1 tsp black pepper

The directions for preparing either batch of nuts is almost entirely the same.  Preheat oven to 250 degrees fahrenheit. Place the seasoning spices all in one large bowl and mix together with a spoon.  Place the egg white and tablespoon of water in a separate bowl and whisk until frothy.  If making the smokey spicy nuts add the hot sauce in with the egg white and water.  Once frothy, add the nuts into the bowl and gently stir until all nuts are coated with the mixture.  Next, transfer nuts into the bowl with the spices and stir until all nuts are evenly coated with the spices and no dry mixture remains at the bottom of the bowl.  Pour the nuts into a casserole dish or rimmed baking sheet and place in the oven.  Bake for one hour, stirring every fifteen minutes.  Remove from the oven, allow to cool and enjoy!


Monday, November 29, 2010

Avocado Salad with Citrus Viniagrette

Avocado Salad with Citrus Vinaigrette
Hi everyone! So this past week I was fortunate enough to have my entire family here in San Sebastián visiting me for Thanksgiving, and all the eating and site seeing cut into my blog time a bit.  I hope you all had a fantastic Thanksgiving filled with much turkey, stuffing and pumpkin pie.  My family and I enjoyed a large plate of traditional spanish ham, a large tortilla de balacao or spanish omelette with salt cod, a steaming pot of fabana or bean soup, and topped it all of with an apple tart with rosemary whipped cream and vanilla gelato yummmmm.  Not the most traditional Thanksgiving I'll ever have but certainly a memorable one.  

However, all of the ridiculously rich spanish delicacies I ate over the past week made me feel just a teensy bit guilty... so here I am with Cook. Eat. Enjoy. Repeat.'s first ever salad! I don't know how they do it but the grocery store below us always seems to have ripe avocados, so I figured I'd take advantage of those.  And with one orange and a few strategically placed cherry tomatoes this salad is light and delicious!  I am of the Ina Garten school of thought that nothing used to garnish a plate should ever be inedible, thus, the tomatoes add another juicy element to the salad.

Ingredients:
1/2 avocado
1/2 orange
1 tsp orange zest
2 tbsp fresh orange juice
2 tbsp olive oil
salt and pepper to taste
Cherry tomatoes to garnish


Using a fine cheese grater, or zester if you have one, zest the skin of the orange into a small bowl until you have 1 tsp of zest.  Only zest the outer most layer of skin because the white pith beneath it is bitter.  Orange zest smells just as good as freshly squeezed orange juice and adds color, flavor and fragrance to the dressing.  Next, thinly slice the top and bottom off of the orange so that it can stand upright. Balance the orange on one of the flat sides and use a knife to cut the rest of the skin off.  Once all you have left is the juicy center, use the same knife to cut the sections out of the orange and set the sections aside.  Squeeze what remains of the orange into the small bowl with the orange zest.  Make sure you don't get any seeds in there! Add the olive oil to the bowl, season with salt and pepper, and mix with a spoon.

Next, slice the avocado length-wise around the pit. Using good old fashioned elbow grease, twist each half of the avocado in opposite directions and pull them apart.  The pit will most likely still be stuck to one of the halves, in which case you should take a knife and whack it into the pit with a decent amount of force and twist until the pit pops out.  If the pit popped out after separating the avocado halves, lucky you. At this point, I find it easier to cut the avocado halves into thin slices and then remove the skin, otherwise you may leave some of the avocado behind if you remove it with a spoon first.  Once the avocados are sliced, remove the skin from each section and arrange on a plate or in a bowl with the orange slices.  Spoon the vinaigrette over the salad and enjoy!


Thursday, November 18, 2010

Hearty Vegetable Soup

Hearty Vegetable Soup


Two blog posts in one week?!? Unheard of during my abroad experience, and yet, here I am again!  This vegetable soup wasn't originally created with my blog in mind, but after making it my roommates and I agreed that it was just too good not to share with all of you!  And when I say hearty vegetable soup, I mean hearty.  I dare you not to feel satisfied after a bowl of this stuff.  This soup is also the easiest and cheapest way to feed four people...which is great for me considering that Europe is putting a serious dent in my bank account.  Another great thing about this soup is that it's pretty much a no-recipe recipe.  This means that, although I've made a version of this hearty vegetable soup three times now, it's never the same twice!  You can add just about any vegetables or beans you like and it will be just as delicious.  Feel free to add chicken or your favorite small noodle to make this soup just a bit heartier.  I'm going to give you the recipe for the latest version I made because it was especially good, and my favorite thus far.


Ingredients
2 tablespoons olive oil
1 zucchini
1 eggplant
1 red pepper
3 carrots
2 celery stalks
2 tomatoes
10 button mushrooms, sliced thin
1 small bag baby spinach
1 cup garbanzo beans
2 cloves garlic, minced
4 cups chicken broth
1 packet vegetable soup seasoning


In a large pot over medium high heat, place the two tablespoons of olive oil.  Mince the garlic and dice the zucchini, eggplant, red pepper, carrots, celery, and tomatoes.  Slice the mushrooms.  Once the oil is heated, add the carrots, garlic and celery to the pot and allow to cook in the oil for five minutes, stirring occasionally.  Next, add the rest of the diced vegetables, the beans, the chicken broth and the seasoning packet.  If you feel like using a seasoning packet is cheating then I guess you could add garlic powder, onion powder, salt, pepper, parsley and bay leaves to suit your tastes but honestly, the seasoning packet is just easier and they've done all the measuring work for you.  Let the soup simmer for 25-30 minutes over medium high heat or until all the vegetables are tender.  Once everything is cooked through, add the spinach to the soup and stir until wilted, about one minute.  Ladle into serving bowls and garnish with grated parmesan cheese if you like. Enjoy!

Monday, November 15, 2010

Cranberry Cornbread

Cranberry Cornbread
I wanted to make something reminiscent of the Thanksgiving holiday, considering that this will be the first Thanksgiving in my entire life where I do not inhale two heaping plates of turkey, mashed potatoes, gravy and stuffing.  When I asked my roommates which food items screamed "Thanksgiving!" to them, they said cranberries. I had been thinking of cornbread myself, so what better way to please all than to combine the two? Don't let the amount of butter in this recipe shock you.  I assure you, the calories are entirely worth it.  I adapted this recipe from Ina Garten's recipe for Jalapeño Cheddar Cornbread, essentially taking out all of the savory ingredients of her recipe and replaced them with cranberries.  Good 'ol Barefoot Contessa never lets you down.

Ingredients

    3 cups all-purpose flour
1 cup white corn flour
1/4 cup sugar
2 tablespoons baking powder
2 teaspoons kosher salt
2 cups skim milk
3 extra-large eggs, lightly beaten
1/2 pound unsalted butter, melted
1 cup dried cranberries


Preheat the oven to 350 degrees fahrenheit and grease a 9 x 13 inch baking dish with butter. In a large bowl, combine the flour, corn flour, sugar, baking powder and salt. In a small bowl, combine the milk, eggs and butter. Using a spoon, mix the dry ingredients into the wet until most of the lumps are dissolved. Don’t over-mix or else your cornbread will be flat instead of fluffy! Mix a little more than half of the cranberries into the batter. Pour the batter into the prepared dish, smooth the top, and sprinkle with the remaining cranberries. Bake for 30 to 35 minutes. You may not think the cornbread is done baking because of the bubbles of butter that may still be rising up the sides of the dish, but remove it from the oven and allow to cool.  The butter in this recipe is necessary because it almost rehydrates the dried cranberries so that they are plump, sweet and delicious.  Cut the cornbread into large squares, serve warm or at room temperature and enjoy!

Monday, November 8, 2010

Pintxos and Paris

Pintxos
For the first time in my life, I had the pleasure of taking a real cooking course!  The course was centered around learning how to cook and assemble traditional Basque pintxos.  Pintxos, as I've mentioned in previous blog posts, are the Basque version of Spanish tapas.  Most pintxos entail some sort of meat or seafood, seasoned to perfection atop a slice of baguette and adorned with  some type of vegetable or cheese. Pictured above is probably one of the most common and traditional pinxtos you'll find in the Basque region.  It is serrano ham, goat cheese, and a roasted red pepper on a small toast.

In my pintxos course, we learned how to make ham croquettes, a perfect spanish tortilla, fried calamari, and a gazpacho avocado shooter among other traditional pintxos.  The same week I learned how to make pintxos of my own, I explored the wide array of pintxos bars here in San Sebastián. Among some of the most impressive were a perfectly cooked piece of sirlion topped with a thin slice of green pepper and a pinch of sea salt and a tiny dish of garlic risotto garnished with micro-greens and edible flora.  However, the pintxo that was certainly the most memorable was a cooked pigeon breast atop potato puree, with a rice paper sign reading "PUM!" and fake blood painted onto the plate, shown above.  Also in San Sebastián you may find a kangaroo taco, slow-cooked pigs ears, or fried anchovies with garlic confit.  The kangaroo is surprisingly delicious if only a bit chewier than the red meat we're used to. I'll get to the pigs ears eventually...


Paris
Paris, in my opinion, is the only city that compares to San Sebastián in terms of beauty, sights,  and food quality.  I made it my business to try each and every quintessentially french food item in existence.  These included macaroons, shown above, which are the famous french cookies that come in dozens of different flavors and fillings. I also made sure to ingest some authentically french roquefort cheese, crepes, eclairs, champagne, french onion soup and escargot!  Sweet or savory crepes are available at street-side vendors which seem to pop up every ten feet in Paris. Nutella, a creamy chocolate hazelnut spread is by far the most popular crepe filling.

One french dish that I unfortunately could not try due to my pesky shellish allergy was moules frites, or mussels and fries.  Moules frites are a popular lunch item also sold at street-side vendors along the Parisian streets.  There are baskets of fresh shellfish on shelves lined with lemons ready to be consumed. I conveniently forgot my shellfish allergy, however, while indulging in a plate of escargot doused in garlic butter. Whether snails are, in fact, shellfish is still up for debate.  But maybe the tiny shells they were served in should have tipped me off...either way, they were delicious and I didn't experience a hint of an allergic reaction!  Even though Paris was by far my most expensive trip, I couldn't have asked for a better experience.  Perfect weather, perfect company and perfect food made Paris a very memorable trip :)

La Tour Eiffel
La Joconde (The Mona Lisa)


Thursday, November 4, 2010

Savory Baked Breakfast Cups

Savory Baked Breakfast Cups
I don't remember exactly what inspired me to make these but I know they've been on my list for quite some time now and I am verrrry proud of the final result!  I have been craving a savory breakfast item for a while since all breakfast in Spain is sweet.  They wouldn't dream of having ham or cheese for breakfast let alone spinach and mushrooms! These savory baked breakfast cups are like the quintessential savory breakfast combination all wrapped up in one.  The ham crisps up in the oven and the egg sets creating a nice bundle of deliciousness.  This recipe is fairly quick too so if you're looking to make an impressive breakfast for a small group, go for it!

Ingredients
12 slices serrano ham or prosciutto
1 tablespoon olive oil
1 cup finely diced mushrooms
1/2 bag baby spinach
1/2 cup grated parmesan cheese
1/2 cup shredded mozzarella cheese
2 cloves garlic, minced
6 eggs
Salt and pepper to taste

Preheat oven to 350 degrees fahrenheit. Over medium-high heat, place the one tablespoon of oil in a skillet and allow to heat up. Each breakfast cup uses two slices of ham to form the cup, therefore this recipe makes six breakfast cups.  You could use one 6-cup muffin tin but I suggest using two 6-cup muffin tins so that you can put the ingredients in every other cup and remove them from the tin much more easily.  

Taking two pieces of ham, lay them in a cross shape across one muffin cup and gently press them down so that they loosely form a cup shape.  Fold the tops of the ham slices outward onto the surface of the muffin tin. Finely mince the garlic and chop the mushrooms into a small dice.  Add them to the heated oil and allow to cook without moving them for five minutes.  After five minutes stir the mushroom and garlic in the pan, add the spinach and cover.  Check the mixture periodically after five to ten minutes and remove from heat once the spinach is fully wilted.  Once the spinach is wilted, add the half cup of parmesan and mozzarella cheeses and stir until well combined.  Spoon a large tablespoon of the cheesy spinach mixture into each ham-lined muffin cup. At this point, you should crack one egg over each cup.  The egg white will sink down and set in the oven and the yolk will stay on top of the vegetables.  I tried to gingerly crack my eggs so that I would have six nice whole yolks, one on the top of each cup.  However, that didn't work out as planned.  If your yolks stay whole, great.  If they don't, that's great as well.

Pop the muffin tins in the oven for twelve to fifteen minutes or until the egg whites are set.  Remove from the oven and allow to cool.  Remove from the muffin tins by gently grabbing two of the ham corners and lifting it out of the tin or by using two spoons to scoop them out.  Season each with a tiny pinch of pepper over the top and enjoy!

Wednesday, October 27, 2010

Spaghetti a la Amatriciana

Spaghetti a la Amatriciana
I'm extra excited about this dish because I know it came from an authentic recipe.  The first time I ever tried this slightly spicy pasta was at an italian restaurant this summer and I knew I wanted to recreate it.  Lucky for me, one of my italian friends, Alberto, was kind enough to give me his family recipe!  If you can picture in your mind, every italian stereotype manifested in a single human being, you have Alberto. Not only is Alberto a pasta expert, but he eats pasta at least once a day in portions about three times the normal size.  And when I asked if we could use whole wheat spaghetti instead of white, Alberto, in all his Gap-clad italian glory replied NO!  

Alberto's father taught him how to cook this recipe and his grandmother taught his father and now Alberto has taught me :) Originally, pasta a la amatriciana was made by shepherds using pig's cheeks and pecorino cheese only.  After Napoleon brought tomatos from America to Italy, tomato sauce was added to the mix, along with white wine, hot peppers and garlic.  There are several versions of pasta a la amatriciana that involve varying amounts of olive oil, garlic and hot peppers.  The recipe we used is considered to be traditional save the fact that we used bacon instead of pig's cheek.  And if Alberto weren't there to harness my affinity for garlic, this dish probably would've turned out a little heavy on the spice! I highly recommend cooking with a native Italian, if not for the credibility and expertise, then certainly for the exaggerated hand gestures and delicious food!

Ingredients
1 tbsp olive oil
2 cloves garlic
6 oz. bacon, diced
1 28 oz. can whole tomatoes
1/2 cup white wine
1-2 tbsp crushed red pepper
1 1/2 cups grated pecorinocheese
1 box spaghetti
Salt and pepper to taste

Place one tablespoon of olive oil in a large sauté pan over high heat.  Place the cloves of garlic in the oil and allow the pan to heat up.  Once the garlic is golden brown on the outside, remove from the pan and discard. After dicing the bacon, place in the pan and sauté until desired crispness is reached, stirring constantly.  Once the bacon is crispy, remove it from the pan using a slotted spoon and place on a plate lined with paper towels. In the same pan, add the crushed red pepper and stir for a few minutes before adding the entire contents of the canned whole tomatoes.  If you want your sauce to be on the spicier side go for two tablespoons but if you prefer just a slight pepper flavor just add one. Once the tomatoes are added, allow to simmer for 7-8 minutes.  During this process, continuously mash the tomatoes with a fork to create a chunky tomato sauce.

Bring a large pot of water to boil.  Add a small handful of salt and add the dry spaghetti. Once the tomatoes have been simmering for 7 or 8 minutes, add the wine and bring to a boil.  Once the wine has boiled, put the crispy bacon back into the pan with the tomatoes and allow to simmer until the pasta is cooked al dente.  Right before straining the spaghetti, add one cup of the pecorino cheese into the sauce and stir.  Strain the pasta and pour it right into the sauté pan with the sauce.  Stir everything together and transfer to a large serving bowl.  Pour the remaining half cup of pecorino cheese on top to garnish. Enjoy!

Sunday, October 24, 2010

Italian Wedding Soup

Italian Wedding Soup
Once again the weather here influences my cooking.  The other morning after biking to school in the uncharacteristically chilly weather, my roommate Lexie commented "I really just want some soup".  Next thing you know...we have soup! Italian Wedding Soup has always been one of my favorites and not only does it not require a blender, but the ingredients are so simple I knew I could find them in any grocery store.  This soup was the perfect way to repay our friends Caitlin and Jane who had us over for delicious jambalaya on Sunday and the perfect way to end a chilly Monday.

Ingredients


For the meatballs:
1 1/4 lb ground chicken
1/4 cup seasoned bread crumbs 
3 cloves finely minced garlic        
2 tsp dried parsley
1 tsp dried oregano
1/2 tsp salt
1/2 tsp pepper
1 large egg

For the soup:
3 tbsp olive oil
1 medium yellow onion 
1/2 cup diced celery
1/2 cup diced carrots
1 tsp garlic powder
5 cups chicken brother
4 cups water
1/2 cup dry white wine 
1/2 cup very small pasta
1 bag baby spinach
Salt and pepper to taste
Parmesan cheese to garnish
Preheat the oven to 350 degrees fahrenheit and line a rimmed baking sheet with foil. In a medium bowl, lightly mix all the ingredients for the meatballs with your hands.  Yeah it gets messy but hand mixing is the best way to ensure all of the ingredients get incorporated without being over-mixed. Using a tablespoon, scoop up small amounts of the ground chicken mixture and shape lightly with your hands into 1 to 1 ¼ inch balls. Place the balls on the cookie sheet. Bake for 30 minutes, until cooked through and lightly browned.

In the meantime, heat the olive oil over medium heat in a large pot. Add the onion, carrots, celery,  and garlic powder and sauté until softened, about 5 to 6 minutes. Add the wine and bring to a boil. Next, add the broth and water and bring back to a boil. Then add the pasta and cook until the pasta is al dente. Add the meatballs to the soup and simmer for 2 minutes. Add spinach and stir just until the spinach is wilted. Season with salt and pepper to taste. My advice at this point would definitely be to garnish the soup with grated parmesan cheese. Enjoy!


Saturday, October 16, 2010

Apple Cinnamon Muffins

Apple Cinnamon Muffins

Since the weather here in gorgeous San Sebastián is starting to get a little chilly, I wanted to bake something that reminded me of Fall.  And being from New York where apple picking is a fundamental childhood memory, these muffins were the perfect thing!  I also wanted to use my fancy new silicone muffin molds.  Thanks, once again to the Asian Bazaar for supplying me with all the bakeware I could want at ridiculously low prices.  These muffins aren't sweet so if you prefer them a little sweeter I would add more sugar.  And according to a friend of mine, I'm on a little bit of a "cinna-binge", but the flavors of apples and cinnamon couldn't be more reminiscent of fall so I hope you forgive me! These muffins also stay super moist because of the apple inside. And one last thing, this marks my second baking success while having to convert measurements to grams! Woo!

Ingredients
4 tablespoons butter or margarine
1/4 to 1/2 cup sugar depending on how sweet you want them
2 eggs
2 1/2 cups flour
1/2 teaspoon salt 
4 teaspoons baking powder 
3/4 cup milk
1 apple peeled and finely chopped
2 tablespoons cinnamon

These muffins are SO easy!  The hardest thing about them is peeling the apple and that takes about a minute. Preheat oven to 400 degrees fahrenheit. In a large bowl cream together the butter and sugar.  Add flour, eggs, salt, baking powder, milk, and chopped apple pieces..  Using a ladle or big spoon, put the batter in muffin molds.  This recipe should yield 12 good sized muffins.  Bake in preheated oven for twenty five minutes or until done.  About ten minutes before the muffins are done, open the oven, and sprinkle a tiny pinch of cinnamon on the top of each one.  If you do it any earlier the cinnamon will burn. Remove from the oven and allow to cool. Enjoy!

By the way, I seriously recommend getting silicone bakeware. You don't need to grease it, you don't need those paper muffin cups and literally NOTHING sticks to it! I was amazed.  Below is a picture I just wanted to put up of San Sebastián the other night around dusk.  Isn't it pretty?


Thursday, October 7, 2010

Cinnabars

Cinnabars
These babies barely lasted long enough for me to take pictures! Seriously, I was a little worried by the way my roommates were hovering around the oven.  The smell was absolutely tantalizing.  After visiting Barcelona this past weekend, and seeing all of the delectable sweets and other yummy things at La Boquería market, I figured it was time to add another dessert item to my blog repetoire.  I actually got this recipe from Betty Crocker — she knew what she was doing. The first time I made these cinnabars was for a road trip with a few of my friends over the summer.  We downed the entire tupperware before we even got to our destination.  And after a debut like that, these cinnabars deserved a comeback.  Plus, it's my friend Maarten's birthday today so I can pretend I made them for him ;)

La Boquería in Barcelona
Ingredients
2 1/3 cups flour
1 1/4 teaspoons baking powder
1/2 teaspoon salt
3/4 cup butter
1 1/4 cups  sugar
1/2 cup brown sugar
3 eggs
1/4 teaspoon vanilla extract
1 tablespoon sugar
1 tablespoon cinnamon
1 cup powdered sugar
2 tablespoons milk
1/4 teaspoon vanilla extract


I faced several obstacles before successfully completing this recipe. First, It took me FOREVER to find baking powder in the local grocery.  Incidentally, it is not called "polvo de hornear" but "levadura".  Glad I know that now.  I also couldnt find vanilla extract if my life depended on it! Furthermore, not only did I mix the entire recipe by hand even though it's first few words were "with an electric mixer...", but I also converted all of the measurements to grams so that I could use my new spanish measuring cup.  These are the reasons why I am especially glad that the cinnabars worked out so well!

Preheat oven to 350° F. Mix one tablespoon of sugar and one tablespoon of cinnamon together in a small bowl and set aside. Grease the bottom of a 13x9-inch baking dish.

In a large bowl, beat the butter and sugar until creamy. Adding one egg at a time, mix eggs and vanilla into sugar mixture until combined. Gradually beat in dry ingredients until well combined. Pour half the batter into the baking dish and spread evenly.  Take the cinnamon-sugar mixture and pour it evenly over batter. Using a large spoon, dollop the rest of the batter into the dish and spread with the back of the spoon. Place in the preheated oven and bake for 20 to 25 minutes or until golden brown. Allow the bars to cool for at least a half hour, and during this time, stir together the cup of powdered sugar and two tablespoons of milk in a small bowl to make the glaze.  Once the bars are completely cooled, drizzle the glaze over the bars and cut into squares. Enjoy!

Saturday, October 2, 2010

Bilbao and Oktoberfest

Bilbao
Last week I finally ventured outside of San Sebastián!  Although I missed my lovely city the entire time.  By some power of God, my roommates and I managed to catch an 8 am bus to Bilbao last Wednesday.  Bilbao is a city about an hour away from San Sebastián and about twice the size.  It's much more industrial but has an old part with just as much charm as the old part here in San Sebastián.  After waking up at 7 am the only thing that would satisfy us upon our arrival at Bilbao was a complete spanish breakfast. In Spain they don't really do waffles or omelets, and definitely not bagels.  A traditional spanish breakfast consists of bread in some form and coffee.  Thus, a plate of napolitanas, a.k.a. pure bliss manifested in pastry form and café con leche satisfied our hunger. After a meal like that we were ready to take on Bilbao!

And by take on Bilbao, I really mean take on Bilbao.  Our main reason for visiting the city was to see the Guggenheim museum, however, we found it necessary to walk the length of the city twice, visit three other museums and one church.  Our tourist stops included the Museo de Arqueología for an introduction to Basque archeology, Museo Vasco for more on Basque history, el Museo de Bellas Artes for the Balenciaga design exhibit.  Balenciaga is considered to be the Picasso of fashion as far as Spain is concerned. And we concluded our museum tour with the Guggenheim.  Shown to the left, the Guggenheim in Bilbao is an exhibit itself.  The museum follows suit of the other Guggenheim museums across the world with its groundbreaking architecture designed by Frank Gehry. We were floored by the exhibits inside as well.  In one day, we had a very comprehensive Bilbao experience, and needless to say, we slept the entire bus ride home.


Oktoberfest
Oktoberfest was epic.  I wish I had more time to explore Munich over the weekend, but the time spent in the tents was more than worth the trip.  Shown above are the famous liter beers that are sold inside the tents at Oktoberfest.  Originally, Germany had a Reinheitsgebot, or ``purity order´´ that the only ingredients that could legally be used in the production of beer were water, barley, hops, and yeast. That order was repealed in 1987.  These beers contain 11% alcohol and sell for 8.50 euros.  But unless you have exact change, say goodbye to your 10, 20 or 50 euro bill.  Oktoberfest is like a giant carnival for adults.  There are rides, games, a ton of food and souvenir vendors, and several giant tents where the beer is sold.    My friends and I arrived at the tents at 7 am, waited for two and a half hours to be let in, and began the festivities at 10 am sharp.

By 11:30 it was time to explore the food options on the premises.  When most people think of German cuisine they think of beer and sausage.  And to be honest, I saw a lot of that this weekend. But in truth, there is much more to German food than beer and brats.   Alongside shnitzel and knödel, one of the most famous german dishes is spätzle. Spätzle is considered to be a noodle, although it is closer to a dumpling.  It´s probably easiest to compare spätzle to italian gnocchi. I know I wasn´t the only one craving a plate of cheesy spätzle this weekend. 

Among the traditional german foods at Oktoberfest, there were pretzels, donuts, bratwurst, several variations on the bread roll, caramel dipped apples, toffee covered nuts, and much more.  My lovely friend Steph is at right modeling the massive size of the pretzels sold in the tents.  To be honest, the pretzels were not quite as soft as the ones found on New York City street corners but with a little mustard they were still delicious!  Carnival food was by far the dominant form of nourishment and we barely ate anything that wasn't beige, but it was definitely a fun weekend!

Sunday, September 26, 2010

Asparagus with Vinagrette

Asparagus a la Vinagreta
Have I mentioned that we STILL don't have wifi? It has been a constant battle with the internet company and they don't quite seem to understand our frustration and borderline fury with them.  And so, my roommates and I spend another evening at a café sipping cappucinos and doing our respective business online. It's ten fifteen right now and a perfect seventy two degrees so I can't complain too much. I brought this asparagus dish to a dinner with some of my international friends before seeing Eat Pray Love at San Sebastián's International Film Festival!  Obviously I waited for two hours outside of the cinema to get a perfect view of Julia Roberts and Javier Bardem walking down the red carpet :)  This asparagus and vinagrette dish was inspired by a one I saw at a local pinxtos bar.  I'd been wanting to make a vegetable dish in order to offset the gelato I've been eating.  Anyway, my friends and roommates especially loved this dish.  Its a really good combination of textures and temperatures because the asparagus are roasted in the oven and the vinagrette is cold.  Plus, if your kitchen is more equipt than mine is right now this dish only takes about fifteen minutes!

Ingredients
One bunch fresh asparagus (approximately 20 spears)
3 cloves garlic
1 red bell pepper
2 medium tomatoes
1/2 small onion
1 lemon
3 tablespoons extra virgin olive oil
1 tsp dried parsley
Salt and Pepper to taste

Hey, guess what?  The oven works!  Took me an extra second to realize it was in celsius rather than fahrenheit but I got it.  Preheat the oven to 400 degrees Fahrenheit.  Wash and trim about an inch and a half off of the bottom of each asparagus spear.  Lay in a baking or casserole dish and drizzle with extra virgin olive oil.  Season lightly with salt and pepper.  Thinly slice two cloves of garlic and sprinkle them over the asparagus.  Bake in the oven for ten minutes.

As for the vinagrette, if we had a food processor or even a blender in our apartment this probably would have resembled more of a vinagrette and less of a salsa but were compromising here!  All the chopping I had to do made this considerably more time consuming but if you have a food processor or blender it will be super simple!  Core and seed the tomatoes and dice as finely as humanly possible.  Do the same with the red bell pepper and onion.  Since your using raw onion you might want to cater this recipe to the amount of raw onion taste you can handle.  I, for one, love onions in any way shape or form so I used half of an onion and the flavor was definitely there.  Place all of the vegetables in a bowl and, using a cheese grater or microplane, grate the remaining clove of garlic. Add the olive oil and squeeze the juice of the one lemon into the bowl.  Watch out for seeds.  Add the teaspoon of dried paprika, stir and taste.  Season with salt and pepper and you're done!  When the asparagus comes out of the oven, place on a serving dish and top with vinagrette. Enjoy!