Thursday, December 23, 2010

Egg Nog

Egg Nog
I think its pretty obvious that egg nog was going to make an appearance on my blog considering just how enthusiastic I am about Christmas.  People often think egg nog is a warm drink because of the foam, which would make sense considering how lovely a sweet warm drink would be during the cold winter months.  However, the foam on top of egg nog is a red herring.  Egg nog is in fact a cold drink and the foam comes from beaten egg whites.  This egg nog is lightened up a little bit because the recipe is by Bethenny Frankel, but it isn't short on flavor whatsoever.  And though the egg nog might not warm you up right away, perhaps a shot of rum or brandy added into the mix will :)

Ingredients
2 eggs plus 2 more whites (whites and yolks separated)
1/3 cup plus 1 tbsp sugar
2 cups milk
1 tsp vanilla extract
1 tsp cinnamon
1 tsp nutmeg

Beat 2 egg yolks until lightened in color. Add the 1/3 cup sugar, beat until dissolved and set aside. Combine the milk with vanilla and a dash each of cinnamon and nutmeg in a saucepan over high heat.  Bring the mixture to a boil, stirring occasionally.

Remove the saucepan from the heat and gradually whisk into egg mixture. This process is called tempering and it prevents the eggs from scrambling.  Return the mixture to the pot and reheat. Remove from heat, pour into a bowl and set in the refrigerator. Beat 4 egg whites in a separate bowl until soft peaks form.  While mixing, gradually add 1 tablespoon sugar and beat until stiff peaks form. Fold whipped egg whites into chilled mixture.  Pour into mugs, sprinkle with cinnamon and enjoy!

Saturday, December 18, 2010

Spearmint Bark

Spearmint Bark
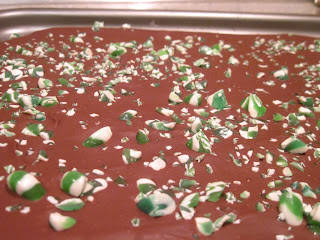
It's definitely looking more like Christmas around San Sebastián.  Several of the streets are lined with lights but I'm starting to get just a littttttle more excited about being home for the holidays :)  Peppermint bark has always been one of my favorites but for some reason candy canes were not as abundantly available in the San Sebastián supermarkets as I had hoped.  After some serious searching, my roommate Brittany spotted some spearmint hard candies in a container at a local corner store.  This spearmint bark tasted SO good and its so easy you really have no excuse not to make it!

Ingredients
12 oz white, milk, or dark chocolate (or any combination of the three!)
1 1/2 cups hard spearmint candies, whole

Before breaking the bark.
There are two ways to go about this recipe.  First, by melting the chocolate in a double boiler.  This method will work perfectly if you are using just one type of chocolate.  However, if you plan on melting white and then milk chocolate the double boiler will probably get to hot and burn the second batch of chocolate.  The second, and in my opinion much easier method, is to put the chocolate in a microwave safe bowl and microwave it in thirty second increments, stirring in between until the chocolate is silky smooth and melted.  If you have some peppermint extract on hand, add a capful into the melted chocolate just to enhance the peppermint flavor even more.


There are two ways of dealing with the spearmint candies as well.  First, by using a food processor.  Second, by placing them all in a plastic bag and whacking them with the back of a frying pan or a meat tenderizer until all of the candies are in tiny pieces.  Both of these methods are equally as effective, although one tends to be more stress relieving than the other.  Once the chocolate is melted and the candies are pulverized, use a fine mesh sieve to strain the larger pieces of candy from the more powdery bits.  Allow the candy powder  to fall into the chocolate and stir.  Pour the chocolate onto a baking sheet lined with aluminum foil and spread using a spatula.  Then, sprinkle the larger pieces of candy on top of the chocolate.  Pop the baking sheet in the refrigerator for an hour and you'll have a large sheet of spearmint bark like the one pictured above.  Once the chocolate is hardened break off pieces however large or small you like them and enjoy!

Friday, December 10, 2010

Gluten-Free Peanut Butter Cookies with Nutella Ganache

Gluten-Free Peanut Butter Cookies
with Nutella Ganache
Let me just start off by saying that these cookies are my masterpiece.  While getting into the Christmas season cookies were naturally my first thought.  My best friend Jadry is among the 1% of people in the United States that have celiac disease and being that her and I have shared countless meals together, I understand how hard it is to find delicious, gluten-free desserts.  I promised Jadry that I would blog a recipe especially for her and I couldn't be prouder of these gluten-free cookies.  I promise you will not miss the gluten one bit whether you're a celiac or not!

Ingredients
1 cup creamy peanut butter
1/2 cup granulated sugar
1/2 cup brown sugar
1 egg
1 tsp cinnamon
1 tsp baking powder
1/2 cup nutella
1/2 cup heavy cream

Preheat oven to 350 degrees fahrenheit. Place the peanut butter, granulated sugar, brown sugar, egg, cinnamon and baking powder in a bowl and mix thoroughly.  Line a baking sheet with foil or parchment paper.  Using your hands, roll the dough into balls about an inch in diameter.  You should be able to make about twenty balls and place them on the lined baking sheet.  Then, press down each ball of dough twice with the back of a fork to form the classic x-shaped peanut butter cookie imprints.  Allow to bake in the oven for ten minutes.

Place the nutella and heavy cream in a small saucepan over medium heat.  Cook for about ten minutes until the nutella has melted and the mixture is smooth then remove from the heat and stir occasionally.  Remove the cookies from the oven, allow to cool, and drizzle with the nutella ganache.  Enjoy!

Saturday, December 4, 2010

Holiday Spiced Nuts

Holiday Spiced Nuts Two Ways
Do you know anyone who is entirely obsessed with Christmas and the holiday season?  I mean someone who is a fully consumed, unhealthily preoccupied Christmas maniac? The answer is yes, you do, and that person is me.  I shamelessly blast my Christmas playlist on repeat every year starting the day after Thanksgiving and my Christmas countdown usually begins on December 26th. However, I do have a bit of an excuse in taking so much joy in the Christmas season and that is because my birthday is on December 25th as well :) But considering that it's only December 4th, I figured I would spare you my full-blown Christmas excitement just yet...but fear not, I certainly plan on bombarding you with edible Christmas treats over the next few weeks!  

These Holiday Spiced Nuts Two ways are festive enough to whet your appetite for all foods Christmasy but not too festive to make you feel like you're jumping the gun.  How perfect!  I made one sweet batch of holiday nuts and one smokey and spicier batch, so whatever your preference, I have a holiday snack for you!  Keep in mind when reading these recipes that you can substitute any nuts you like!  I like mixing different sizes and textures of nuts.  Walnuts and pecans tend to work especially well because their little nooks and crannies hold the seasoning well.

Sugared Walnuts and Spanish Almonds
Ingredients:
8 oz walnut halves
8 oz spanish almonds
1 egg white
1 tbsp water
1/2 cup granulated sugar
1/2 cup brown sugar
1 tbsp cinnamon

Smokey Spicy Mixed Nuts
Ingredients:
6 oz walnut halves
5 oz peanuts
5 oz cashews
1 egg white
1 tbsp water
1 tbsp hot sauce
2 tbsp salt
2 tbsp garlic powder
1 tsp sweet paprika
1 tsp curry
1 tsp black pepper

The directions for preparing either batch of nuts is almost entirely the same.  Preheat oven to 250 degrees fahrenheit. Place the seasoning spices all in one large bowl and mix together with a spoon.  Place the egg white and tablespoon of water in a separate bowl and whisk until frothy.  If making the smokey spicy nuts add the hot sauce in with the egg white and water.  Once frothy, add the nuts into the bowl and gently stir until all nuts are coated with the mixture.  Next, transfer nuts into the bowl with the spices and stir until all nuts are evenly coated with the spices and no dry mixture remains at the bottom of the bowl.  Pour the nuts into a casserole dish or rimmed baking sheet and place in the oven.  Bake for one hour, stirring every fifteen minutes.  Remove from the oven, allow to cool and enjoy!